Apply Custom Animation Effects in Presentation
How to Apply Custom Animation Effects in Presentation
Custom animation to set up animation effects to the text or object in the current slide. These animation effects are easy to use and allow the user to make each and every slide unique.
The settings of each animation effects can be adjusted to fit all kinds of needs. The user can customize the speed, motion path and duration of each animation effect.
If there are animation effects on a slide, they will appear in order and can be rearranged within the Custom Animation task window.
Types of Custom Animation
There are three categories for custom animation effects in wps presentation.
1. There are 52 different Entrance Effects, which decide how objects initially appear on the slides.
2. There are 52 different Exit Effects, which decide how objects disappear from the slides.
3. There are 31 different Emphasis Effects, which decide the actions that objects perform on the slides.
Add Animation to Text or Objects
Step 1. Choose a slide containing text or other objects. Select the text or objects to which you want to add animations.
Step 2. Click Custom Animation icon in the Animation tab to open the Custom Animation task window.
Step 3. Click the Add Effects icon in the Custom Animation task window, and there are four options in the drop-down list.
Entrance: Choose this option to add an animation effect to the object when entering the slide.
Exit: Choose this option to add an animation effect to the object when exiting the slide.
Emphasis: Choose this option to make an object perform a special effect when pressing the slide.
Motion Paths: Choose this option to designate a specific path for the object to follow on the slide.
Note:
1. Select Play icon in the Custom Animation task window will show a preview of the animations.
2. Click the Slide Show button to preview the slide in the Slide Show mode with all of the animation effects included.
Modify Animation
1. Open the Custom Animation task window.
Click Custom Animation icon in the Animation tab or select the object to be modified and right-click it. Then choose Custom Animation in the context menu.
2. Modify the Start Time
There are three options : Start On Click, Start With Previous, and Start After Previous.
Start On Click: Choose this option will start the animation effect when the user clicks the mouse.
Start With Previous: Choose this option will start the animation effect at the same time as the animation effect preceding it.
Start After Previous: Choose this option will start the animation effect after the animation effect preceding it has finished.
3. Modify the Direction
In Direction section, the user can modify the direction objects enter or exit the slide form.
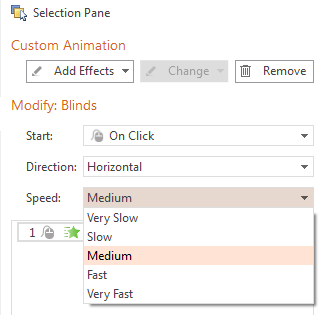
4. Modify the Speed
Click the drop down arrow of Speed. There are five options to choose: Very Slow, Slow, Medium, Fast, and Very Fast.

Change Animation
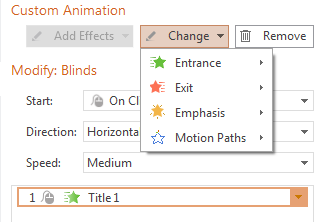
To change the animation effects of one or more objects, select them in the Custom Animation task window and click Change icon, shown as below:
Choose the animation effect you want to change with in the drop-down list.

Rearrange the Order
Step 1. Select the slide you want to rearrange the animation.
Step 2. Click Custom Animation icon in the Animation Tab.
Step 3. Select the animation effect that needs to be rearranged in the Custom Animation task window and drag it to form the desired order.
Remove Animation Effects
Step 1. Select the animation effect that you want to delete in the Custom Animation task window.
Step 2. Click Remove icon in the Custom Animation task window or select Remove in the drop-down list, shown as below:

Not what you're looking for?
 Join our Facebook Group
 Feedback

