How to insert Table of Contents in WPS Writer
How to Insert TOC in WPS Writer
Insert Table of Contents set TOC level for the selected paragraph and add a Table of Contents to the document. To create a table of contents, first apply heading style to the text that you want to include in the table of contents, such as, heading 1 and heading 2.
Insert a TOC
The steps to insert a table of contents are as follows:
Step 1: Check heading styles
Select the text you want to include in the table of contents, and then set the heading styles for them. Choose a heading style in the Home tab, such as, Heading1. Check the text you want to include in the table of contents to ensure that they have a consistent heading style format.

Do this for all of the text you want to show up in the table of contents.
Tips: To apply a heading style (see the Style group in the Home Tab ), position the insertion point in the title, and click the preferred heading style displayed in the Home tab. If you don't see the style you prefer, click the pull down button to expand the style library.
Step 2: Select the position
Place the insertion point where you want to insert the table of contents, which is usually at the beginning of the document.
Step 3: Click the Insert TOC icon
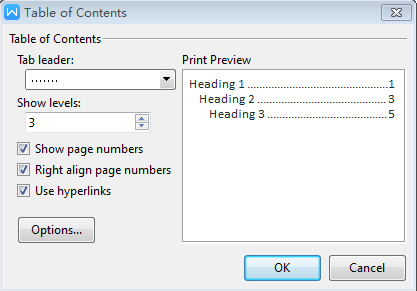
Click the Insert TOC icon in the Reference tab and the Table of Contents dialogue box will open, shown as follows:

Show page numbers: Choose this check box will display numbers beside each title.
Right align page numbers: Choose this check box will align the page numbers to the right.
Use hyperlinks: Choose this check box will make the table of contents automatically generate hyperlinks with the corresponding contents.
Step 4: Specify distance
In the Tab leader drop-down list, you can specify the distance between the title and the page number.
Step 5: Specify title level
In the Show levels text box, you can specify the title level that will be showed in the table of contents (e.g. If you choose specify 1, only Heading style 1 will be showed in the directory. If you choose 2, level 1 and level 2 heading will both be showed in the contents).
Step 6: View effect
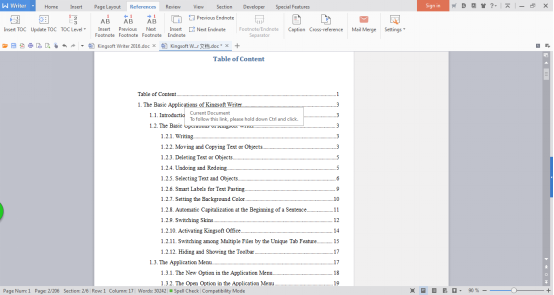
Click the OK button to complete this operation. The result is shown below:

Not what you're looking for?
 Join our Facebook Group
 Feedback

