Guide to Using Screenshot Feature in WPS Teams
Feature Summary
"Screenshot" allows you to capture a specified area of the screen and paste or send it directly to a chat, with the shortcut for quick activation.
Feature Description
| Feature Dimension | Description |
|---|---|
| Membership Restriction | No membership restriction |
| Version Restriction | No version restriction |
Steps
Trigger Screenshot via Toolbar
Feature Entry
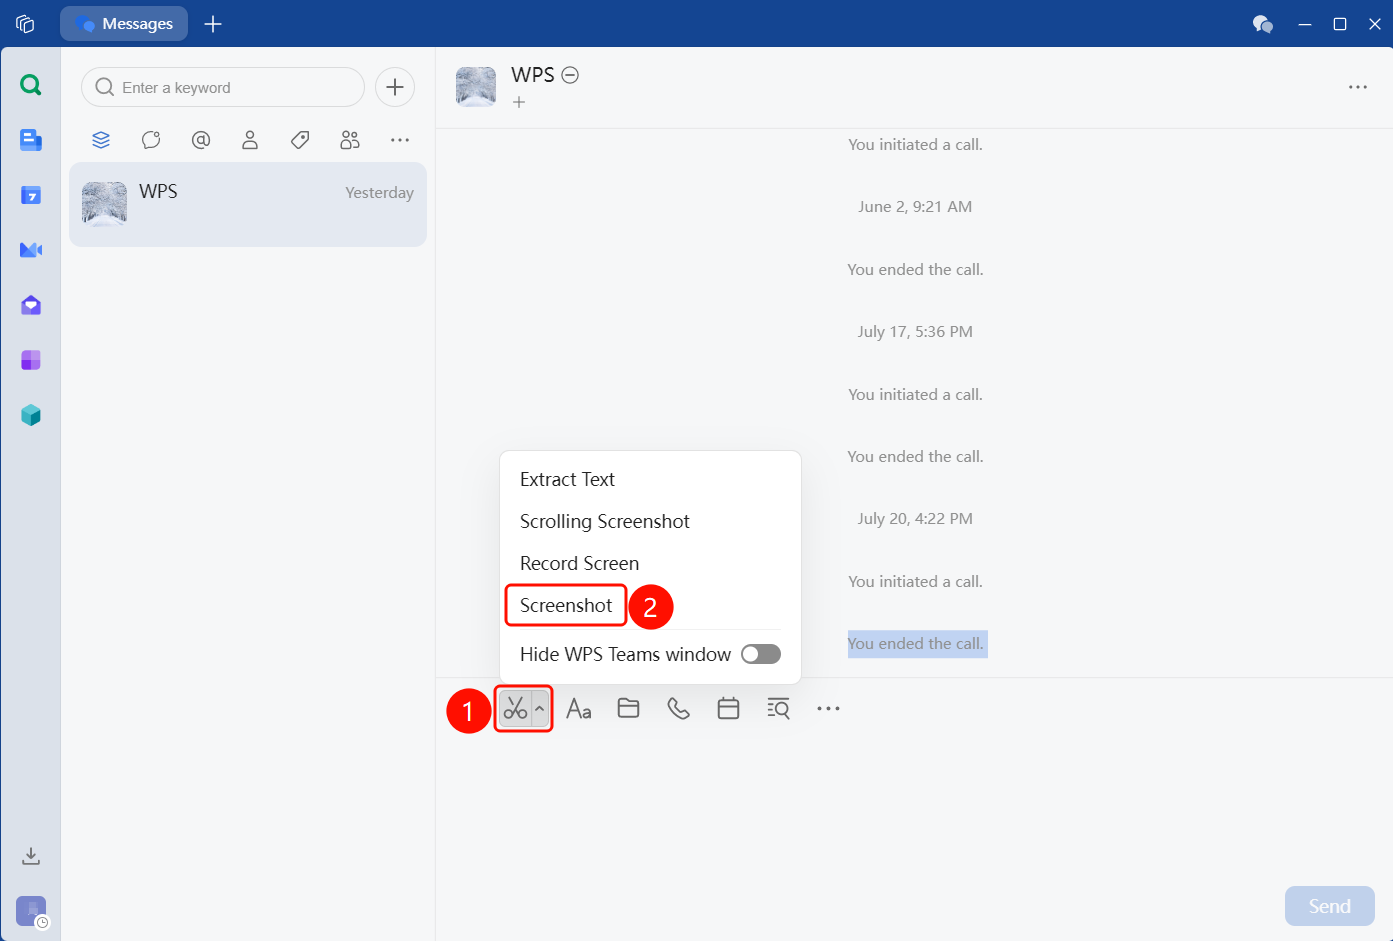
Message editing bar toolbar → ✂ button → "Screenshot"
- In the toolbar of the message editing bar at the bottom of the chat interface,Hover the cursor over the ✂ icon (screenshot button).
- A dropdown menu will appear with the following options:
| Menu Option | Win-Shortcut | Mac-Shortcut | Description |
|---|---|---|---|
| Screenshot | Ctrl + Shift + A |
Cmd + Shift + A |
Capture a specified area of the screen |
| Hide Current Window and Screenshot | — | Hide the WPS window and capture the screen content underneath |
- Select "Screenshot", the cursor will turn into a crosshair, drag to select the capture area.
- After the capture is complete, the image will appear in the input box. You can press
Enterdirectly to send it, or click the "Send" button to send it.
Hide Current Window and Screenshot
Feature Entry
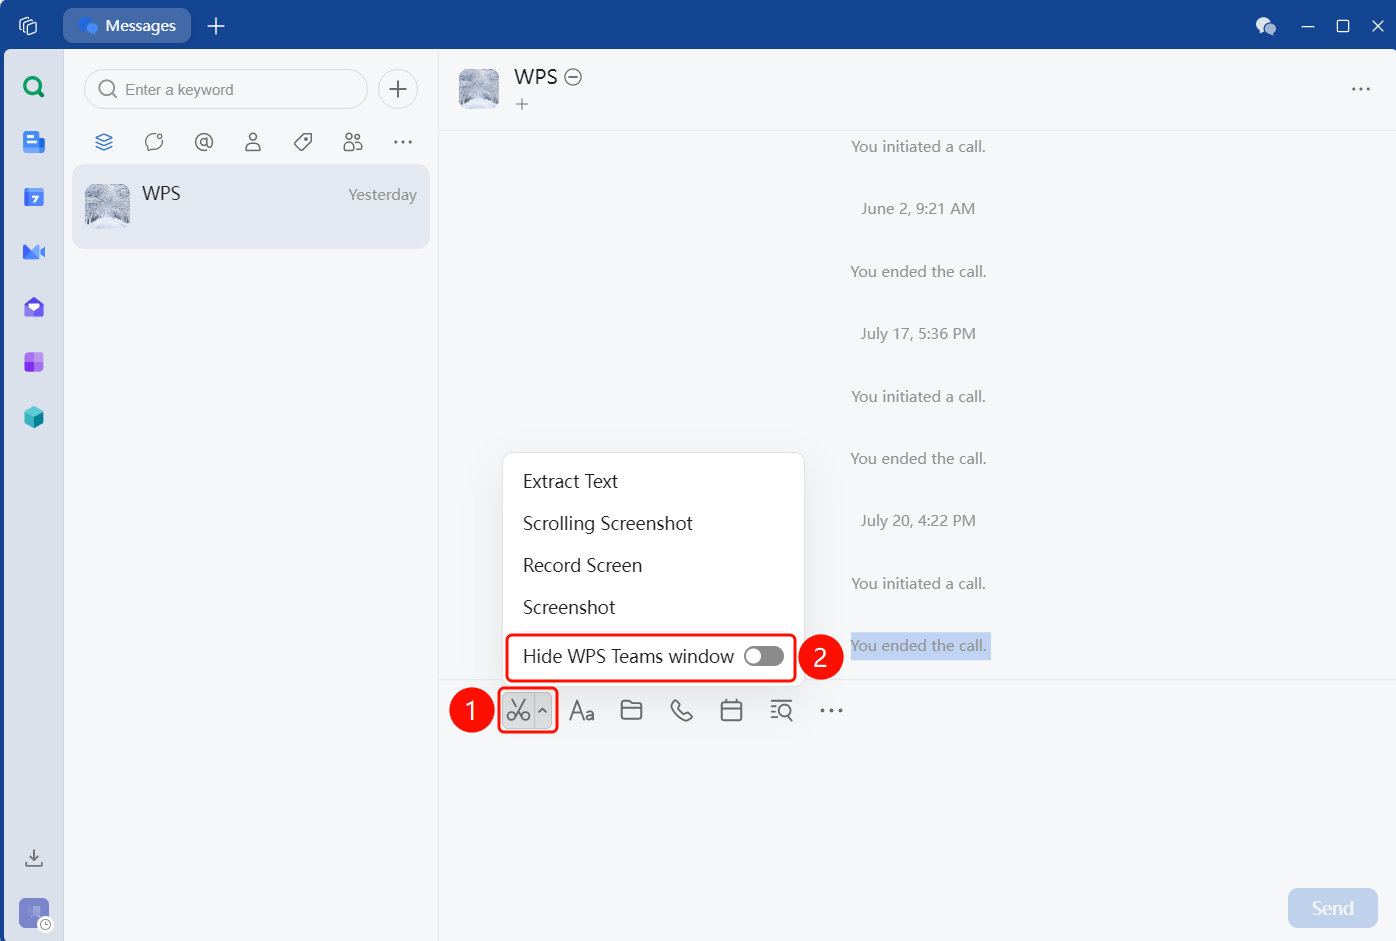
Message editing bar toolbar → ✂ button → "Hide WPS Teams window"
- Hover the cursor over the ✂ icon in the toolbar to open the dropdown menu.
- Select "Hide WPS Teams window", the WPS window will automatically hide.
- Capture the screen area in crosshair mode. After the capture is complete, the image will appear in the input box.
- This is suitable for scenarios where you need to capture content obscured by the WPS window.
Trigger Screenshot via Shortcut
Feature Entry
Win-Shortcut: Ctrl + Shift + A
Mac-Shortcut: Cmd + Shift + A
- Press
Ctrl + Shift + A/Cmd + Shift + Ain any interface to directly enter screenshot mode (no need to open the menu). - Use the crosshair to drag and select the capture area.
- After the capture is complete, preview it in the input box and send it after confirming it is correct.
Screenshot Selection and Annotation Editing
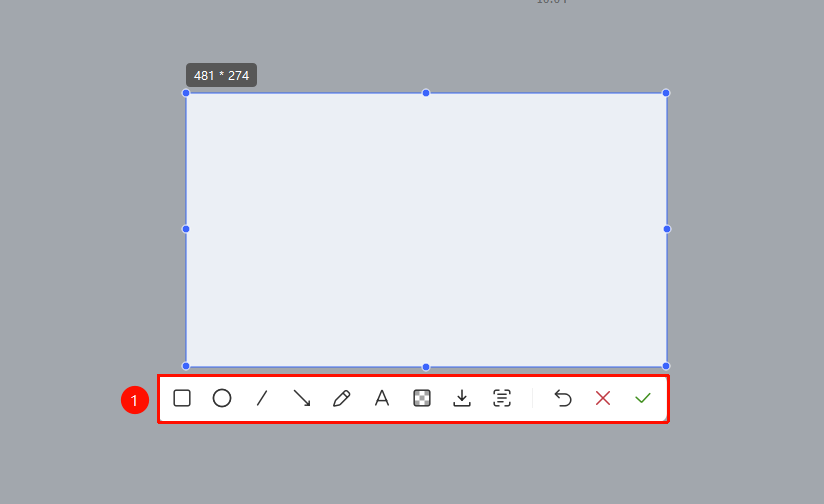
After dragging to select the capture area, a blue selection box and a bottom annotation toolbar will appear on the screen, allowing you to edit and annotate the screenshot before sending.
Selection Operations
- Drag the 8 circular control points on the blue border to adjust the size and scope of the capture area
- The current selection dimensions (e.g., 497 × 284 pixels) are displayed in real-time in the upper left corner of the selection
Bottom Annotation Toolbar
| Tool Icon | Description |
|---|---|
| Rectangle Tool | Draw a rectangular annotation box |
| Ellipse Tool | Draw a circular/elliptical annotation box |
| Line Tool | Draw a straight line |
| Arrow Tool | Draw an indicator line with an arrow |
| Brush Tool | Draw freehand annotations |
| Text Tool (A) | Insert text annotations into the screenshot |
| Mosaic | Add a mosaic overlay to obscure parts of the screenshot |
| Save | Save the screenshot to a local file |
| Extract Text | Extract text content from the screenshot |
| Undo Edit (↩) | Undo the last annotation operation |
| Exit Screenshot (✕) | Cancel this screenshot and close screenshot mode |
| Done (✓) | Confirm the screenshot and insert the image into the input box |
- After dragging the capture area, release the mouse to fix the selection range.
- Select an annotation tool from the bottom toolbar and draw or add text within the selection.
- After annotation is complete, click the green "✓" confirm button, and the screenshot will be inserted into the chat input box for preview before sending.
- To cancel this screenshot, click the red "✕" cancel button to exit screenshot mode.
FAQ
Q1: What is the shortcut for screenshot?
- Solution:
Ctrl + Shift + A(Mac:Cmd + Shift + A). Press it to directly enter screenshot mode without opening the menu.
Q2: How to edit and annotate after taking a screenshot?
- Solution: After the screenshot area is selected, an annotation toolbar appears at the top, providing annotation tools such as rectangle, brush, and text. After completing the annotation, click confirm, and the image will appear in the input box for sending.
Q3: How to capture content obscured by the current window?
- Solution: Click the ✂ icon and select Hide Current Window Screenshot. The WPS window will automatically hide, and then capture the content underneath that was previously obscured.
Notes
- The screenshot shortcut works when WPS Collaborate is the active window
- When using Hide Current Window Screenshot, the WPS window will be temporarily minimized and automatically restored after the screenshot is completed
- Captured images are saved in the input box by default, support preview before sending, and will not be sent automatically